Sunday, December 30, 2012

Never Underestimate Your Painting Abilities: A Fix-It Lesson

A nice gentleman left a gift for me in my new space at Consignage Home & Garden.  He makes these nice pedestals but said he didn't think he had a knack for painting them and wondered what I would come up with.


I decided rather than starting over, this pedestal was the perfect painting lesson.

The secret to aged, distressed finishes are multiple layers of paint, sanding, and then enhancing character with antiquing which can be achieved with a variety of products.

My new friend had applied three different colors of paint which was fine for the first step.  It looks to me like he painted the most neutral color first, the gray driftwood color.  Next, he added the second most neutral color, the yellow; and last, the boldest color, the blue.  In theory, I understand why he did it this way.  I also like to use those proportions; mostly neutral, less medium color and the least amount of the boldest color.  However, I usually approach them as if they had been painted over time applying the boldest color first, and so on, ending in the most neutral color.  That way, when you sand back, you reveal the colors the more you sand with the boldest color showing up last in the smallest amount.  It's more work but gives you a more authentic look if that's what you're after.


Using a fine sandpaper, I simply sanded the entire pedestal which blended and blurred the different colors into each other and exposed some of the natural wood.


My favorite method for antiquing is to use a stained paste wax.  I prefer Fiddes Supreme Wax in Rugger Brown.


Wearing rubber gloves and working in small sections, apply the wax with a chip brush or piece of an old t-shirt and wipe off immediately with a clean cloth.


Once the entire piece is waxed, you can buff it to the desired sheen using a pine brush on a power drill or a clean cloth.

So, next time you are struggling with your painting skills, just tell yourself it's step one and keep adding layers until you achieve the desired finish.

Check out the "Finishes" button at the top of the blog for links to specific posts on various finishes I have tried.


Thursday, December 27, 2012

Time To Try Something New: Paint & Crackle Color Experiment


While I haven't posted in quite awhile, I can assure you I've been hard at work.  Shortly after my last post, I was offered a space at Consignage Home & Garden starting December 1.  The call came on my way out of town for week and I wouldn't be arriving back home until just before Thanksgiving....no pressure there.  Of course, I said yes and my wheels started turning.  With my workshop now workable I decided to hit the ground running.

My new space had no real walls so I would need to get creative.  Even when there are walls, I like to soften the corners or create a little interest on a flat wall.  Folding screens are the perfect solution.  They offer a pop of color, a little dimension, add height where needed, make a nice backdrop for vignettes, and when placed with the louvers up they are a great place to hang things.

I had two pair of unfinished closet doors found at Habitat For Humanity but you can also recycle old painted doors; just sand a little and clean them up for the first coat of paint.   Since I've been going through a neutral finish phase on my refinishing projects, I decided to do something a little more bold on the doors to give me a darker backdrop to the lighter furniture.  I didn't really have a color in mind when I started, but thought it was time to change it up and do something different than I've ever done before.  Inspired by a French tablecloth, I decided on a mustard yellow under coat with a rich blue on top.

I usually use Antique Crackle from The Old Fashioned Milk Paint Company, but have heard that white glue works too.  I decided this would be the perfect project to do a comparison of the two.


I started with a first coat of Mustard Yellow from The Old Fashioned Milk Paint Company.  I use an old plastic bowl and wire whisk to mix the powdered paint and add Milk Paint Extra Bond.

You don't have to worry about complete coverage on the first coat since there will be a couple of other treatments to follow.  The goal is to have just a little mustard yellow showing through the blue and you may want to have some of the natural wood showing through as well. (Note:  The color in this photo has been enhanced and because of lighting is not a true representation.)


Once all four panels were painted, I applied white glue to one side of the doors in spots where I would want a little crackling.   Although the glue goes on white, it dries clear and made it pretty hard to see where the glue was when I went to paint the second color.  It's also thinner than the Antique Crackle and wanted to slip and drip while it was drying.  It would have been better to let it dry on a horizontal surface.

On the reverse side of the doors, I used my usual Antique Crackle from The Old Fashioned Milk Paint Company.  I still prefer this product by far.  It is thicker than the white glue and even though it is clear, it dries with a shine that makes it really easy to see when adding the second coat of paint.


The second coat of paint is also from The Old Fashioned Milk Paint Company and is called Soldier Blue.  Again, I didn't worry about complete coverage because I plan to sand the whole thing again anyway.  I'll admit I got a little too messy applying the second coat of paint but this was an opportunity to show how you can't really mess up when creating distressed finishes.

When applying paint over crackle medium, the key is to brush the paint on in one stroke.  If you go back over the crackle a second time you will actually smear and remove the crackle effect.  What happens then is that in trying to get enough paint on your brush to get coverage in one stroke there are heavy paint areas and light paint areas.  Also, because the crackle medium is shiny, the paint over the crackle has a different sheen than the paint over paint.  In the end, I didn't see much crackling at all on the side with the white glue.  The crackle was much better with the Antique Crackle medium.

The final sanding will even all that out.  Just sand to blend the two finishes into each other and sand off any globs and drips.  Sanding will also give the project a more "distressed" look than just a messy paint job.

Now, you can choose to seal the project in a couple of different ways.  A clear sealer of any type will keep the color as you see it.  I wanted to tone down the brightness and give the project even more depth so I chose to use Fiddes Supreme Wax in Rugger Brown.  I've detailed this process in the post How To Build A Bed From A Bench With A Barn Red Finish.  


The last step was to age the hinges.  I didn't want shiny new hinges on my distressed "aged" screen so while I was busy painting, the hinges and screws were soaking in a rust activator.  After rusting things, I always use a clear spray sealer to give them a finished look.  A satin sealer will give a more matte look but if you want the rust to look shiny use a gloss sealer.   I've made a small spray booth out of an old cardboard box.  I removed just the top flap to allow me to see what I'm spraying.  This works great to keep the spray confined when I need to do this inside the workshop on a rainy day.  Just make sure to open a window for ventilation. This box is doing double duty; after rusting a bunch of roofing nails, I just stuck them in the top of the box to make them easy to spray seal.  This also works for screws and knobs.  Just a little workshop tip!


....and here's the finished product again.  The dramatic blue corner screen looks great in my new space.  There are two pair available.  They can be displayed separate or hinged together for a four panel screen....or they can be installed as originally intended as closet doors.

For Sale at  Consignage Home & Garden for $149.95 per pair.

Well, it's not raining, the sun is trying to break through and although it's cold outside I have HEAT in my workshop so I think it's finally time after the holiday hoopla for me to sneak away and see what projects await.


Saturday, November 17, 2012

After Hurricane Sandy: Valve Handle Coat Rack

Sometime, events going on around us subconsciously effect where we go creatively.  The first chance I had to get back into the workshop happened to be the week Hurricane Sandy devastated the east coast.

I think that's part of why I couldn't bring myself to blog for a couple of weeks.  Although I didn't personally know anyone affected by the storm, my heart still goes out to all the people who have been.  It didn't seem right to be so comfortable when others were, and still are, struggling just to get through each day.

I found that during my self-imposed blogosphere silence, I really took time to reflect.  I was keenly aware of everything I could do without power.  We've grown so used to convenient, quick, and easy but there is something to be said about the satisfaction of using hand tools.  It forces you to slow down.  I discovered I enjoyed the quietness, the pace and sense of accomplishment.

While the hurricane was on my mind, I also realize that one of the main focuses of the workshop remodel had to do with controlling water.  It makes so much sense to me now, as I was re-organizing my workshop, that I was drawn to my collection of shut off valve handles.  And that's how the inspiration began....

I've had this one green and white fence board for who knows how long.  I just love, love, love, old chipped paint!  It's a sickness, really.  I hoard it until just the right project comes along.  When the fence board was about four feet long, I had attached shelf brackets to the bottom for feet and vintage towel racks (you know the ones that have about four swinging arms) on each side of the top and it served as a craft show display rack for my sister's knitted scarves.

I cut off the ends that had the holes from it's former life and ended up with about a 36" plaque.  I had already sanded and waxed the board so this was going to be a  pretty quick project.

Before working on the front of the coat rack, I mounted two keyhole hangers on the back side.  Keyhole hangers can be found in the same area of the hardware store that you would find "D" rings. I like the keyhole hanger for this project because it will keep the plaque flat against the wall and sturdy.

 I sorted through my collection of valve handles and found five (I like odd numbers) that were similar in size.  The two larger ones had square holes so I was going to need a washer.

I remembered that I had a stash of long dark screws and rubber washers that I used to use to install iron drapery hardware back in my decorating days.


The long screws would be great because they would allow some distance between the board and the handle.

A rubber washer on each side keep the handle in place at the end but I don't really want to have the screw be my post.

My plan for this rack is actually to use as a display piece for aprons at Pomar Junction Vineyard and Winery where I help with the retail merchandising.  A little offset will give me room for a couple of aprons on each handle.


Since I'm working with a "water" theme, I decided copper pipe was the perfect solution.  As I was cleaning out my husband's "pipe crib" during the remodel, I had come across several lengths of copper pipe that he liked to keep around for repairs.  I asked if he would mind if I raided his stash every now and then for a project.  Who knew it would be so soon.

Cutting copper pipe is very easy with this manually operated pipe cutting tool.  Simply place the pipe in the tool and tighten by turning the knob at the end of the tool; right-y tight-y, left-y loose-y.


The top of the tool has a roller and the blade sits tight on the opposite side of the pipe.  Just roll the tool around the pipe; and as you can see, there is a score mark.  When it gets easy to turn, tighten the knob at the bottom and continue rolling and turning until the piece breaks free.


I cut the copper pipe to a length that would still leave enough screw length to go all the way through the thickness of the wood without popping out the back.

If you plan to hang a lot of weight on this rack, it's probably a better idea to drill a nut-size recessed hole from the back and use a nut and bolt rather than a screw.  However, this finished rack feels pretty strong.


In the spirit of not using power tools for this project, I mark the placement of the handles with an awl.  This gives me plenty of pilot hole since I'm using a screw and want it to be as tight as possible.

For this project, even if I wanted to use power tools, hand tightening is better.


A perfect fit, and I love the look!


As tempted as I was to keep this rack for myself to hold my workshop aprons.....


It looks perfect in Pomar Junction's old farmhouse tasting room.

Friday, November 16, 2012

I'm Ba-a-a-a-ck...with A Blog-worthy Update.


I know...it's been wa-a-a-a-ay too long!  I never intended to stay quiet for so long and I promise everything's fine...I've been nesting!

It has come to my attention that I  haven't posted in awhile; and I've listened!

I can assure you I haven't been resting on my laurels.   I've been working like a madwoman trying to get my workshop buttoned up for winter.  I just didn't think that daily updates would be very interesting.

Here's a little look-see at the project.  It's not quite finished and not very pretty but I'm working on it.

FIRST PROBLEM AREA:

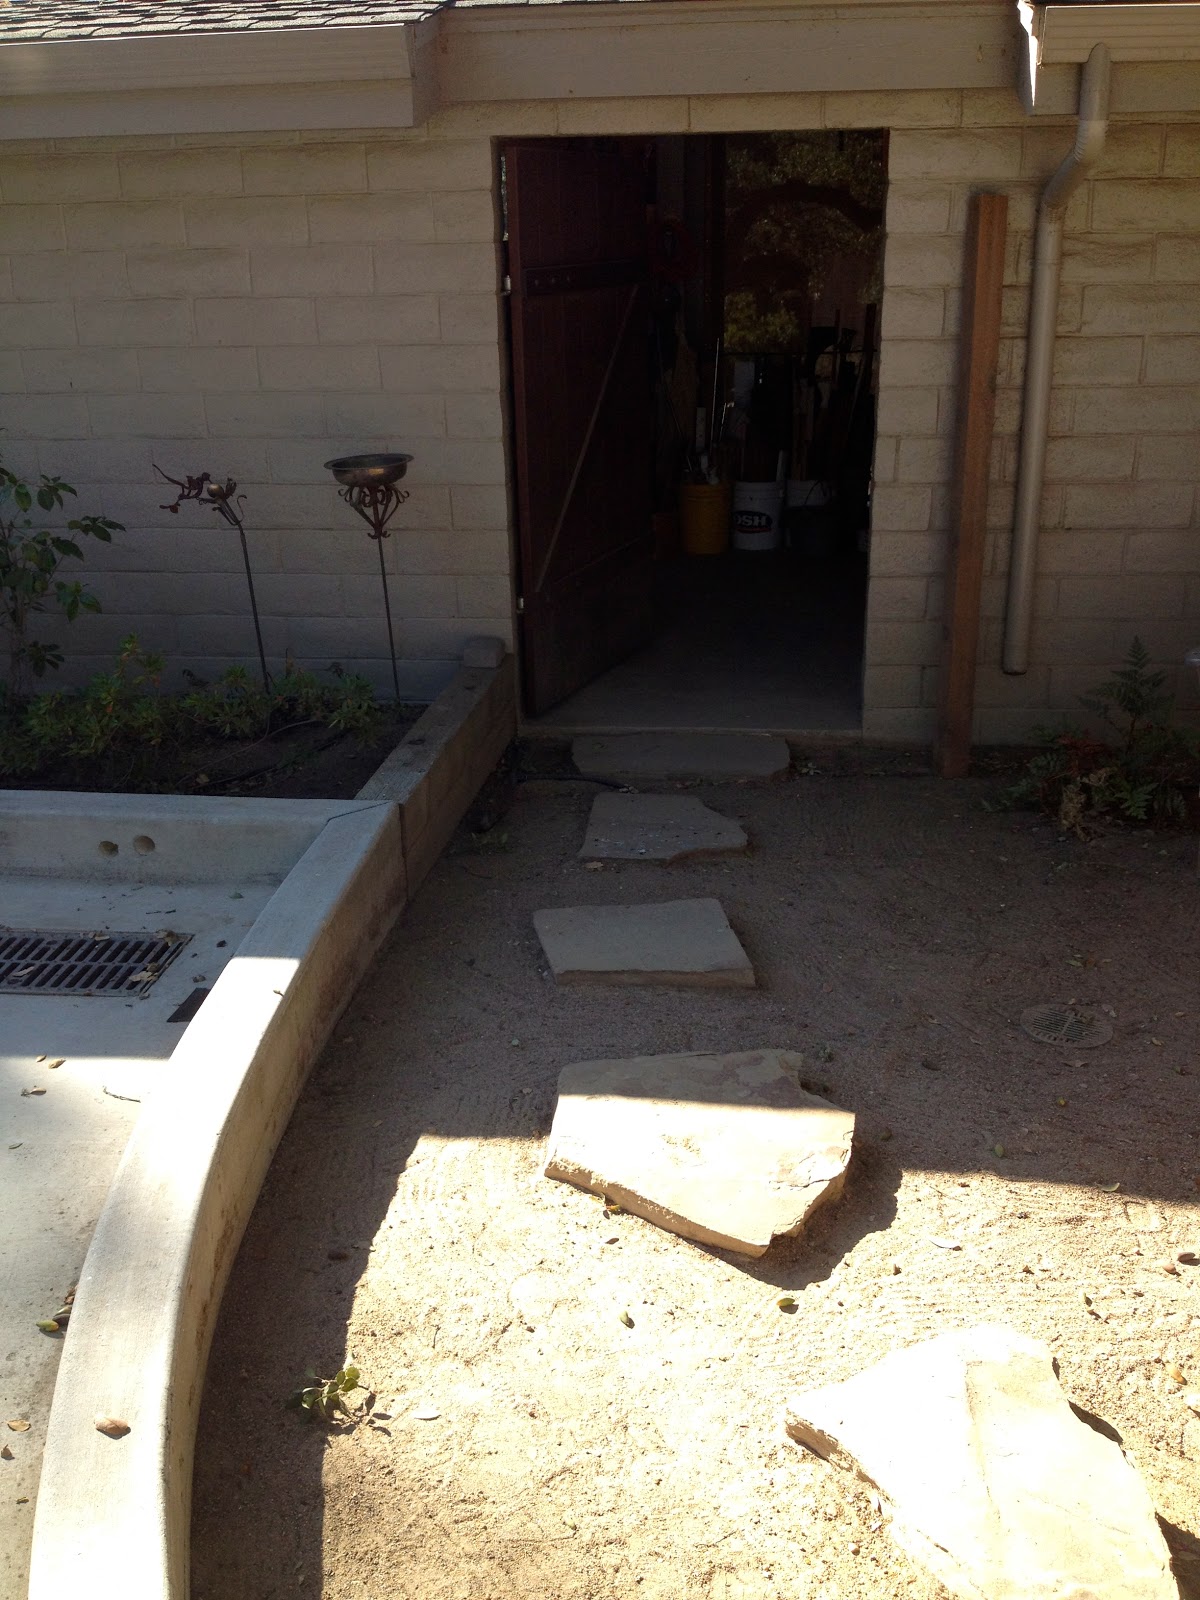
To recap, this used to be the best way to get in and out of the workshop.  Hardly ideal, traversing a curb and then navigating the raised stepping stones.


This was the other access, from the driveway (not shown on the right) through the dirt to a second driveway, over more dirt and if I'm lucky and the path is clear, through the "often flooded in the winter" lawnmower port.

THE FIX:

First, move the propane tank that sat next to the block wall and take down the ugly tarp.

Next, remove the gates and a portion of the concrete...it always looks worse before it looks better.


Then, to keep the water out of the workshop, add a trench drain.

Dig out a new path connecting the driveways so that I can just wheel everything in on a dolly....no traversing necessary!  Yeah!


With the framework in, we're ready to pour.


We also added concrete where the propane tank used to be.  This will give us a spot to add a little tool shed for shovels and rakes and such...The slope will send the water down the long driveway to another trench drain below.


It's a beautiful thing!  Now it's smooth sailing from the truck to the shop.  I'm a happy girl!


We enclosed the old mower port and added a sliding barn door.  Not only did this give me a new great entrance, but the perfect place to store all my wood, out of sight when I'm in the workshop but close at hand.


Since we used the existing posts to build the new exterior wall, I gained another foot on the inside.  This was the perfect spot for five gallon buckets to hold all my short pieces of wood and trim moldings with the taller pieces at the other end, corralled with wall brackets mounted at various heights.  The wall also holds a ladder and dolly.


On the opposite side, there's plenty of room to stack doors, shutters, windows and all the larger sheets of wood.  My husband had previously built a sort of "crib" that he used to hold extra pipe and long pieces of wood.  He offered to remove it but I decided I could use every inch of storage space and asked him to leave it up and I could use it for shorter items in the other direction.


Sweetheart that he is, he took scraps of plywood and built a platform on the "crib" so my stuff wouldn't fall through.  I had lots of "stuff" and wanted to use every inch of space but in a way that I could easily access my "stuff". 


 Here's what I came up with:  For longer pieces, I cut the bottom out of several five gallon buckets and left the bottom in for the shorter pieces.  Then I just screwed the buckets to the wood frame to hold them in place.  This way, I was able to stack the buckets two high and maximize storage.


ISSUE NUMBER TWO:

How does the song go?  "Baby, it's cold outside."

This is what the east wall of the workshop used to look like.  The only thing between me and nature was a short block wall.

We removed the block header (which was cracked and did absolutely nothing).  Then, we enclosed the top of the block wall and installed a couple of windows to let the natural light in.  I would have really missed seeing the trees outside. Between enclosing this wall and the mower port, I gained storage and keep the cold out.


As if that wasn't enough, my wonderful husband installed a heater with a blower.  My hero!  The smart man even put it on a timer, sort of like a toaster oven, so that I don't have to worry about remembering to turn it off.  I just walk in and turn the timer to 10-15 minutes and with the blower it has the chill out of the shop in no-time.

THIRD ON THE WISH LIST:  Who needs power and lights when you have a drop down and construction lights?

Remember the old string of construction lights?  Gone.  Although, I did want to keep the pull down power cord-on-a-reel in the center of the shop.  It really is handy for sanding and buffing.

Every wall has power outlets now and we added new lighting over every workspace on a couple of different switches so they don't have to all be on at once.  The block wall turned out to be a great place for all the power tools.  I hung the ShopVac on the block wall for easy cleanup around the sawing/routing area.

I've recycled part of an old kitchen island to hold all my tools when not in use.  The doors help keep the dust out.  I put the island on casters so that I can keep it against the wall most of the time, but wheel it out to get at the tools or if I need to cut longer pieces of wood.  I find it quite handy.

NEXT REQUEST ON THE LIST:  Water.  Before, if I needed water I had to trek over the stepping stones, through a breezeway, through the main garage and up a few steps to the mudroom.  Inconvenient to say the least.  I used to keep a bottle of water in the shop just in case I needed to thin paint or something.  Yeah, there was always a hose bib but that meant mud.

Now, I have a great wash sink that's nice and deep.  My husband even installed a hot water pump so I have hot and cold running water!  I mounted a recycled upper cabinet on the wall to hold cleaning supplies, a first aid kit, garbage bags, etc.  I mounted a piece of peg board on the left side by the sink (not shown) to hold paint brushes so they can drip dry, scrub brushes, and a paint brush comb.  The tool cabinet below (found at a garage sale for $5) holds my milk paint mixing stuff.

The center section of this south wall used to be an open space covered by a tarp.  Originally, the entire wall was open because there are steps leading down to a small basketball court.  (Before, this was my shop, it was a sort for rec. room when my son was a teenager.  That was the first remodel.  Before we moved here, it was an indoor/outdoor kennel for a variety of animals, including a couple of tigers.....yes, I did say tigers.

Sometime in the near future, my husband plans to build me a sturdy workbench that goes from the wash basin all the way across the wall to another set of corner kitchen cabinets that I've already installed.

Well, this is about as far as got moving back in, cleaning and organizing before I had to work on a couple of projects....you can only keep a junker down for so long!  I have to say, I feel like the luckiest girl in the world.  Working in this new shop has been amazing!   I can't wait to get in there every chance I get and even enjoy cleaning up at the end of the day!

Stay tuned....I plan to post a couple of new projects in the very near future!

Here's a teaser.....